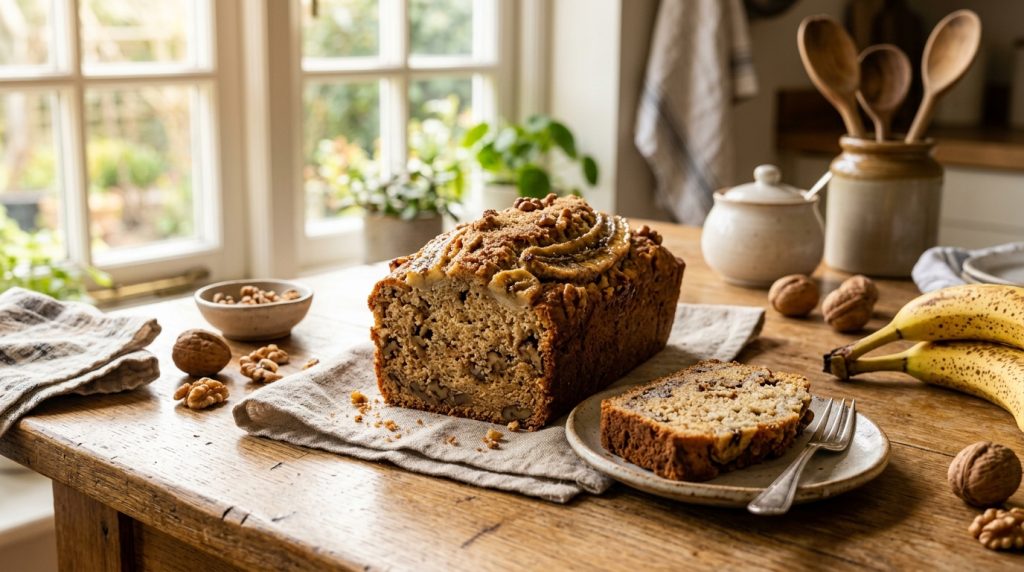
Classic Moist Banana Nut Bread with Toasted Walnuts
There is a specific kind of magic that happens in a kitchen when the scent of cinnamon and caramelized bananas begins to waft from the oven. For many of us, banana nut bread isn’t just a snack; it’s a nostalgic journey back to childhood mornings or rainy afternoon treats. This recipe focuses on achieving that elusive, perfect balance: a tight but incredibly moist crumb, a deep mahogany crust, and the satisfying crunch of toasted walnuts in every single bite. Whether you have a pile of blackened bananas on your counter or you’re looking for the perfect loaf to gift a neighbor, this version stands out because it prioritizes texture and depth of flavor over simple sweetness.
Unlike many quick breads that can turn out cakey or dry, this banana nut bread relies on a specific ratio of fats and sugars to ensure it stays fresh for days. We aren’t just mashing fruit into batter; we are creating a sophisticated emulsion that highlights the natural sugars of overripe fruit. It’s the kind of recipe that makes you grateful you didn’t throw away those “ugly” bananas. Perfect for breakfast with a thick smear of salted butter, or as a late-night snack alongside a glass of cold milk, this loaf is a staple that every home baker should have in their repertoire.
| Category | Details |
|---|---|
| Recipe Name | Classic Moist Banana Nut Bread |
| Cuisine | American |
| Course | Breakfast / Snack / Dessert |
| Prep Time | 15 Minutes |
| Cook Time | 60–65 Minutes |
| Total Time | 1 Hour 20 Minutes |
| Servings | 10–12 Slices |
| Calories | 310 kcal per slice |
| Difficulty Level | Easy |
Why You’ll Love This Recipe
Finding the “perfect” recipe can be a challenge, but this one consistently hits the mark for several reasons. Here is why this will become your go-to loaf:
- Unbeatable Moisture: By using a combination of melted butter and a touch of sour cream (or Greek yogurt), we ensure the bread stays tender and moist for up to five days.
- The “Nut” Factor: We don’t just toss raw nuts into the batter. This recipe encourages toasting the walnuts first, which releases their essential oils and provides a much more complex, earthy flavor.
- Balanced Sweetness: Many recipes use too much white sugar, which can mask the banana flavor. We use a blend of granulated and brown sugar to add a hint of molasses and moisture.
- Waste Reduction: This is the ultimate “zero-waste” kitchen recipe. Those bananas that look like they belong in the compost are actually at their peak sugar content for baking.
- No Fancy Equipment: You don’t need a heavy stand mixer. A couple of bowls, a sturdy whisk, and a fork for mashing are all that’s required for success.
- Versatility: It’s a canvas for your creativity. Once you master the base, you can add chocolate chips, berries, or different spices to suit your mood.
Ingredients You’ll Need
To get the best results, ensure your ingredients are at room temperature. This helps the batter emulsify correctly, preventing a dense or “rubbery” texture.
- Overripe Bananas (3 to 4 medium): You want them heavily spotted or even completely black. This is where the sweetness and aroma come from. You’ll need about 1.5 cups of mashed fruit.
- All-Purpose Flour (2 cups / 250g): Provides the structure. Measure by spooning into the cup and leveling off to avoid packing too much flour.
- Melted Unsalted Butter (1/2 cup / 115g): Butter provides a rich flavor that oil simply cannot match.
- Brown Sugar (1/2 cup, packed): Adds moisture and a deep, caramel-like sweetness.
- Granulated White Sugar (1/4 cup): Helps create those slightly crisp, golden-brown edges.
- Large Egg (1): Acts as a binder. Ensure it is at room temperature.
- Vanilla Extract (1 teaspoon): High-quality pure vanilla enhances the fruitiness of the bananas.
- Sour Cream or Plain Greek Yogurt (2 tablespoons): This is the “secret” ingredient for a tender crumb and a slight tang that balances the sugar.
- Baking Soda (1 teaspoon): Reacts with the acid in the bananas and sour cream to make the bread rise.
- Ground Cinnamon (1/2 teaspoon): Adds a warm, cozy spice note.
- Salt (1/2 teaspoon): Essential for cutting through the sweetness and highlighting the flavors.
- Chopped Walnuts (3/4 cup): Toasted for maximum flavor. You can also use pecans if preferred.
Optional Add-Ins
If you want to take your banana nut bread to the next level, consider folding in 1/2 cup of dark chocolate chips for a decadent twist. Alternatively, a handful of shredded coconut or a tablespoon of orange zest can add a bright, tropical note to the loaf.
Ingredient Substitutions
- For the Butter: You can substitute with melted coconut oil or a neutral vegetable oil, though the flavor will be less “buttery.”
- For the Sour Cream: If you don’t have sour cream or yogurt, a tablespoon of heavy cream or even a splash of whole milk will work in a pinch.
- For the Sugar: You can use all brown sugar for a denser, moister loaf, or substitute the white sugar with coconut sugar for a lower-glycemic option.
Equipment Needed
- 9×5 inch Loaf Pan: The standard size for quick breads.
- Parchment Paper: To line the pan for easy removal.
- Mixing Bowls: One large for wet ingredients, one medium for dry.
- Whisk and Spatula: To ensure even mixing without over-working the gluten.
- Potato Masher or Fork: To break down the bananas into a smooth consistency.
- Wire Cooling Rack: Essential for preventing the bottom of the bread from getting soggy as it cools.
How To Make Classic Banana Nut Bread
Step 1: Prep the Oven and Pan
Preheat your oven to 350°F (175°C). Position your oven rack in the center. Grease your 9×5 inch loaf pan with butter or non-stick spray, then line it with a “sling” of parchment paper that hangs over the long sides. This makes it incredibly easy to lift the bread out once it’s done.
Step 2: Toast the Walnuts
While the oven is heating, spread your chopped walnuts on a small baking sheet. Toast them for 5–7 minutes until they smell fragrant and look slightly darker. This step is crucial for that “old-fashioned” bakery taste. Let them cool slightly before adding to the batter.
Step 3: Mash the Bananas
In a large mixing bowl, peel your overripe bananas and mash them thoroughly. You want a mostly smooth consistency with just a few small chunks for texture. The more you mash, the more moisture is released into the bread.
Step 4: Combine Wet Ingredients
To the mashed bananas, add the melted butter (ensure it’s not piping hot, or it might cook the egg). Whisk in the brown sugar, white sugar, egg, vanilla extract, and sour cream. Mix until the color is uniform and the sugar has mostly dissolved into the liquid. The mixture should look glossy and smell intensely of banana and vanilla.
Step 5: Mix the Dry Ingredients
In a separate medium bowl, whisk together the flour, baking soda, salt, and cinnamon. Whisking the dry ingredients separately ensures that the leavening agent (the baking soda) is evenly distributed, which prevents large holes or uneven rising in your final loaf.
Step 6: Fold Everything Together
Gently pour the dry ingredients into the wet banana mixture. Using a rubber spatula, fold the ingredients together using a “cut and turn” motion. Stop as soon as you see no more streaks of white flour. Overmixing at this stage will develop the gluten and result in a tough, rubbery bread. Finally, fold in the toasted walnuts.
Step 7: Bake to Perfection
Pour the thick batter into your prepared loaf pan and smooth the top. If you like, you can sprinkle a few extra walnut halves or a pinch of coarse sugar on top for a professional finish. Bake for 60 to 65 minutes. At the 50-minute mark, check the color; if it’s browning too quickly, tent the top loosely with aluminum foil.
Step 8: The Doneness Test
The bread is done when a wooden skewer or toothpick inserted into the center comes out clean or with just a few moist crumbs attached. The top should be firm to the touch and have a beautiful center crack. Avoid pulling it out too early, as the center can sink if underbaked.
Step 9: Cool and Slice
Allow the bread to cool in the pan for at least 10–15 minutes. This allows the structure to set. Then, use the parchment sling to lift the loaf onto a wire rack. Let it cool completely (or as long as you can stand the wait!) before slicing. Slicing while hot can cause the bread to crumble.
Expert Cooking Tips
- The Banana Rule: If your bananas aren’t ripe enough, you can “flash-ripen” them. Place unpeeled bananas on a baking sheet in a 300°F oven for 15–20 minutes until the skins are completely black. Let them cool, then scoop out the softened fruit.
- Don’t Overmix: This is the golden rule of quick breads. Use a spatula, not a whisk or electric mixer, for the final stage. A few lumps in the batter are perfectly fine.
- Check Your Baking Soda: Baking soda loses its potency over time. To test if yours is still active, drop a pinch into a teaspoon of vinegar. If it fizzes vigorously, it’s good to go.
- Measure Flour Correctly: If you scoop the flour directly with the measuring cup, you’ll pack it down and end up with too much, leading to dry bread. Use the “spoon and level” method or, better yet, use a kitchen scale (250 grams).
- The Center Crack: If you want that iconic bakery-style crack down the middle, take a knife dipped in melted butter and draw a line down the center of the batter just before putting it in the oven.
Common Mistakes To Avoid
- Using Underripe Bananas: Yellow or green-tipped bananas lack the sugar and moisture needed for this recipe. They will result in a bland, starchy loaf.
- Opening the Oven Too Often: Every time you open the door, the temperature drops. This can cause the bread to bake unevenly or fall in the center. Wait until at least 50 minutes have passed before checking.
- Under-baking the Center: Because banana bread is so dense and moist, the center takes a long time to set. Don’t be afraid of a dark crust; it adds flavor!
- Substituting All the Sugar: If you try to make this sugar-free using only liquid sweeteners like honey or maple syrup, the chemistry changes significantly, and the bread may turn out soggy or overly dense.
- Neglecting the Salt: Salt is a flavor enhancer. Without it, the bread will taste “flat” and the banana flavor won’t pop.
Health Benefits of Banana Nut Bread
While it is certainly a treat, banana nut bread offers several nutritional benefits, especially when compared to traditional cakes or pastries.
- Potassium Power: Bananas are famous for their potassium content, which supports heart health and nerve function.
- Healthy Fats: Walnuts are a fantastic source of Omega-3 fatty acids (specifically alpha-linolenic acid), which are essential for brain health and reducing inflammation.
- Fiber: Between the fruit and the nuts, each slice provides a decent amount of dietary fiber, which aids in digestion and helps keep you full.
- Antioxidants: Walnuts contain more antioxidants than most other common nuts, helping to protect your cells from oxidative stress.
- Energy Boost: The combination of complex carbohydrates from the flour and simple sugars from the bananas provides a quick yet sustained energy source.
For those with specific dietary needs, this recipe is easily adaptable. You can use gluten-free 1-to-1 baking flour, or swap the egg for a “flax egg” (1 tbsp ground flaxseed + 3 tbsp water) to make it more plant-based.
Variations
Vegan Version
Replace the butter with melted coconut oil, use a flax egg as mentioned above, and substitute the sour cream with a dairy-free almond or soy yogurt. The result is just as moist and flavorful.
Gluten-Free Version
Use a high-quality gluten-free all-purpose flour blend that contains xanthan gum. Because GF flours absorb more moisture, you may want to add an extra tablespoon of mashed banana to the mix.
Chocolate Chip Banana Bread
Fold in 1/2 cup of semi-sweet chocolate chips and 1/4 cup of cocoa powder to the dry ingredients for a double-chocolate experience that kids (and adults) will love.
Spiced Pumpkin Banana Bread
Replace half of the mashed bananas with pumpkin puree and add 1 teaspoon of pumpkin pie spice for a seasonal autumn twist that pairs perfectly with coffee.
What To Serve With Banana Nut Bread
Side Dishes
Serve a warm slice alongside a bowl of Greek yogurt topped with honey and fresh berries for a balanced breakfast. It also pairs beautifully with a side of crispy bacon or breakfast sausage for that sweet-and-salty combination.
Sauces and Toppings
While great plain, try topping a warm slice with apple butter, almond butter, or a simple cream cheese frosting. For a dessert-style serving, drizzle with salted caramel sauce or a dollop of whipped cream.
Drinks
A dark roast coffee or a spicy chai latte complements the cinnamon notes in the bread perfectly. For kids, a tall glass of cold milk or a small glass of apple cider is the ideal pairing.
Storage Instructions
Refrigerator Storage
Once completely cooled, wrap the loaf tightly in plastic wrap or store it in an airtight container. It will stay fresh on the counter for 2–3 days, or in the refrigerator for up to a week. Chilling the bread actually makes it easier to slice very thinly.
Freezer Storage
Banana nut bread freezes beautifully. Wrap individual slices in plastic wrap and then place them in a heavy-duty freezer bag. They will stay fresh for up to 3 months. This is perfect for “grab-and-go” breakfasts.
Reheating Instructions
To recapture that “fresh-out-of-the-oven” feel, toast a slice in a toaster oven or heat it in the microwave for 15–20 seconds. If you have the time, pan-searing a slice in a little bit of butter on a skillet creates a caramelized crust that is absolutely divine.
Meal Prep Tips
Bake two loaves at once! Since the oven is already on and you likely have extra bananas, it’s efficient to make a double batch. One for now, one for the freezer.
Nutritional Information
| Nutrient | Amount |
|---|---|
| Calories | 310 kcal |
| Protein | 5g |
| Total Fat | 14g |
| Saturated Fat | 6g |
| Carbohydrates | 42g |
| Fiber | 3g |
| Sugar | 22g |
Nutrition values are estimates and may vary depending on the specific ingredients and brands used.
Frequently Asked Questions
What is the secret to moist banana nut bread?
The secret lies in two things: using extremely overripe bananas and adding a source of acidity like sour cream or Greek yogurt. The extra-ripe bananas provide maximum moisture and sugar, while the sour cream breaks down the gluten strands, resulting in a more tender, “melt-in-your-mouth” crumb.
What is the number one mistake when making banana bread?
Overmixing the batter is the most common error. When you mix flour with liquid, gluten begins to develop. If you stir too much, the gluten becomes tough and elastic, leading to a loaf that is rubbery and dense rather than light and moist. Always mix until “just combined.”
What’s the difference between banana bread and banana nut bread?
The primary difference is the addition of nuts, usually walnuts or pecans. However, a good banana nut bread often adjusts the spice profile (adding more cinnamon or nutmeg) to complement the earthiness of the nuts. The nuts also provide a structural contrast to the soft bread.
Can I use frozen bananas for this recipe?
Yes! Frozen bananas are actually excellent for baking. Thaw them completely in a bowl. They will release a lot of liquid—do not discard this! Mash the bananas along with that liquid, as it contains a lot of concentrated flavor and sugar.
Why did my banana bread sink in the middle?
A sinking center usually means the bread was underbaked or there was too much leavening agent. If the outside looks done but the inside is still liquid, the structure hasn’t set. Always use a toothpick to check the very center of the loaf before removing it from the oven.
Can I make this as muffins instead?
Absolutely. Pour the batter into a lined muffin tin, filling each cup about 3/4 full. Bake at 350°F for 18–22 minutes. This is a great option for portion control and faster cooking times.
| Feature | Quick Recap |
|---|---|
| Prep Time | 15 Minutes |
| Cook Time | 60 Minutes |
| Total Time | 1 Hour 15 Minutes |
| Main Flavor Notes | Caramelized banana, toasted walnut, warm cinnamon |
| Best Occasions | Weekend brunch, holiday gifting, lunchbox snack |
Conclusion
Mastering a classic banana nut bread is a rite of passage for any home baker. It’s a recipe that rewards patience—waiting for those bananas to turn perfectly brown and allowing the loaf to cool properly—but the results are undeniably worth it. This version, with its combination of rich butter, tangy sour cream, and crunchy toasted walnuts, offers a sophisticated take on a humble kitchen staple. It’s reliable, incredibly moist, and fills your home with the most comforting aroma imaginable.
Whether you are baking this for a busy week of meal-prepped breakfasts or as a heartfelt gift for a friend, it is sure to be a success. The beauty of banana nut bread lies in its simplicity and the way it transforms “forgotten” fruit into something celebrated. We hope you enjoy every slice of this tender, nutty loaf. If you try the recipe, please leave a comment below and let us know how it turned out, or share your favorite add-ins with our community! Happy baking!