

Red Velvet Cake Recipe – Moist Cake With Cream Cheese Frosting
The allure of a perfect red velvet cake lies in its contradictions. It is not quite a chocolate cake, yet it carries a whisper of cocoa. It is strikingly bold in color, yet its flavor profile is sophisticated, leaning on the subtle tang of buttermilk and the sharp brightness of vinegar. Finding that elusive balance—a cake that is incredibly moist, structurally sound enough for layering, and topped with a frosting that isn’t cloyingly sweet—is the holy grail for home bakers. This recipe is designed to yield a crumb so soft it truly earns the name “velvet,” paired with a silky cream cheese frosting that complements the cake’s mild acidity.
Whether you are preparing a centerpiece for a romantic Valentine’s Day dinner, a vibrant birthday celebration, or a festive holiday gathering, this red velvet cake stands out. It’s a nostalgic classic that has evolved from its 19th-century roots into a modern icon of American baking. In the following sections, we will dive deep into the science of the “velvet” texture, the importance of specific ingredients like natural cocoa powder, and the step-by-step techniques required to ensure your cake turns out bakery-quality every single time.
| Recipe Name | Classic Southern Red Velvet Cake |
|---|---|
| Cuisine | American |
| Course | Dessert |
| Prep Time | 30 minutes |
| Cook Time | 30-35 minutes |
| Total Time | 1 hour 5 minutes (plus cooling) |
| Servings | 12-14 slices |
| Calories | 485 kcal per slice |
| Difficulty Level | Intermediate |
Why You’ll Love This Recipe
There is a reason red velvet remains one of the most requested cake flavors worldwide. This particular version focuses on moisture and depth of flavor. Here is why it will become your go-to recipe:
- The Texture: Unlike standard sponges, this cake uses a combination of oil and buttermilk to ensure a tight, velvety crumb that stays moist for days.
- Flavor Balance: We use just enough cocoa to provide a hint of chocolate without overpowering the “tang” that defines a true red velvet.
- The Frosting: Our cream cheese frosting is stabilized and balanced, offering a smooth, pipeable consistency that isn’t overly sugary.
- Visual Impact: The deep, crimson hue contrasted against the stark white frosting makes for a stunning presentation without needing complex decorating skills.
- Reliability: This recipe accounts for the chemical reactions between the acid and the leavening agents, ensuring a consistent rise and a tender bite every time.
Ingredients You’ll Need
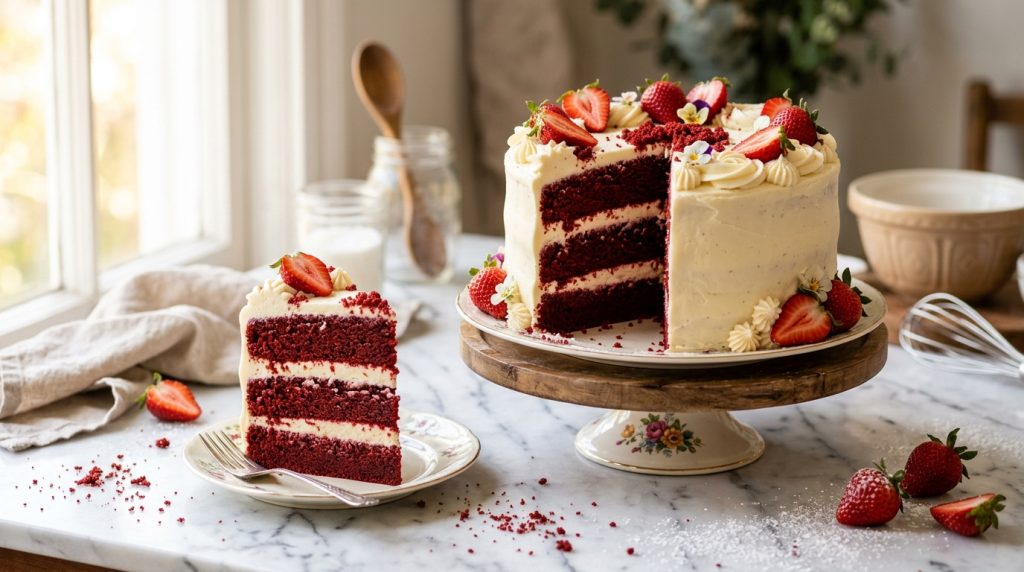
To achieve the perfect red velvet, the quality and type of ingredients matter immensely. This isn’t just about mixing flour and sugar; it’s about chemistry.
For the Cake Batters
- All-Purpose Flour (2 ½ cups): Provides the necessary structure. Sifting is highly recommended for that “velvety” feel.
- Granulated Sugar (1 ½ cups): Sweetens the cake and helps tenderize the crumb.
- Unsweetened Cocoa Powder (2 tablespoons): Use natural cocoa powder rather than Dutch-processed to maintain the proper acidity for the color reaction.
- Baking Soda (1 teaspoon): Acts as the primary leavener when it reacts with the vinegar and buttermilk.
- Salt (1 teaspoon): Enhances all the other flavors.
- Buttermilk (1 cup): Essential for moisture and that signature tang. Ensure it is at room temperature.
- Vegetable Oil (1 ½ cups): Keeps the cake incredibly moist, even when refrigerated.
- Large Eggs (2): Room temperature eggs emulsify better into the batter.
- White Distilled Vinegar (1 teaspoon): Reacts with the baking soda to create lift and preserves the red color.
- Vanilla Extract (1 tablespoon): High-quality pure vanilla adds depth.
- Red Food Coloring (1-2 ounces): Gel coloring provides a more vibrant hue than liquid, but traditional liquid coloring works well too.
For the Cream Cheese Frosting
- Full-Fat Cream Cheese (16 ounces): Must be softened to room temperature to avoid lumps.
- Unsalted Butter (1 cup): Softened to a similar consistency as the cream cheese.
- Powdered Sugar (4-5 cups): Sifted to ensure a silky smooth finish.
- Pure Vanilla Extract (1 teaspoon): For flavor.
- Pinch of Salt: To cut through the sweetness of the sugar.
Optional Add-Ins
- Toasted Pecans: Chopped and pressed into the sides of the cake for a traditional Southern finish.
- White Chocolate Chips: Folded into the batter for extra pockets of sweetness.
- Beet Powder: A natural alternative to red food dye, though the color will be more earthy and muted.
Ingredient Substitutions
- Buttermilk Substitute: If you don’t have buttermilk, add 1 tablespoon of lemon juice or vinegar to 1 cup of whole milk and let it sit for 10 minutes.
- Oil Substitute: You can use melted butter for a richer flavor, but the cake will be slightly firmer and less “moist” when cold.
- Flour Substitute: For a lighter crumb, you can replace the all-purpose flour with cake flour.
Equipment Needed
- Two 9-inch round cake pans
- Parchment paper (for lining the pans)
- Large mixing bowls
- Whisk and silicone spatula
- Electric hand mixer or stand mixer
- Wire cooling racks
- Offset spatula (for frosting)
- Sifter or fine-mesh strainer
How To Make Red Velvet Cake
Step 1: Prep and Preheat
Preheat your oven to 350°F (175°C). Grease your cake pans thoroughly with butter or non-stick spray, then line the bottoms with parchment paper rounds. This is a crucial step; red velvet cake is quite tender, and the parchment ensures a clean release.
Step 2: Sift the Dry Ingredients
In a medium bowl, sift together the flour, sugar, cocoa powder, baking soda, and salt. Sifting the cocoa powder is particularly important as it tends to clump, and you want it evenly distributed to react with the acids later. Whisk these together until the mixture is a uniform, pale sandy color.
Step 3: Mix the Wet Ingredients
In a large mixing bowl (or the bowl of your stand mixer), whisk together the vegetable oil, room-temperature buttermilk, eggs, vinegar, vanilla extract, and red food coloring. Mix until the color is vibrant and the eggs are fully incorporated. The batter should look like a bright, liquid ruby at this stage.
Step 4: Combine Wet and Dry
Slowly add the dry ingredients to the wet ingredients. Using a hand mixer on low speed or a whisk, mix just until no large streaks of flour remain. Be careful not to overmix; overworking the gluten will result in a tough cake rather than a velvety one. The final batter will be relatively thin, which is normal for oil-based cakes.
Step 5: Bake to Perfection
Divide the batter evenly between the two prepared cake pans. Tap the pans gently on the counter to release any large air bubbles. Place them on the center rack of the oven and bake for 30 to 35 minutes. You’ll know they are done when a toothpick inserted into the center comes out clean or with just a few moist crumbs attached. The aroma of light cocoa and vanilla should fill your kitchen.
Step 6: Cool Thoroughly
Allow the cakes to cool in their pans for about 10-15 minutes. This allows the structure to set. Then, carefully run a knife around the edges and invert the cakes onto wire racks to cool completely. Do not attempt to frost the cakes while they are even slightly warm, or the cream cheese frosting will melt and slide off.
Step 7: Prepare the Cream Cheese Frosting
In a clean bowl, beat the softened cream cheese and butter together until completely smooth and pale (about 3 minutes). Gradually add the sifted powdered sugar one cup at a time, beating on low speed until incorporated, then increasing to medium-high until fluffy. Stir in the vanilla and salt. If the frosting feels too soft, chill it in the fridge for 20 minutes before using.
Step 8: Assemble and Frost
Place one cake layer on your serving plate. Spread a generous layer of frosting over the top. Place the second layer on top, bottom-side up (this gives you a perfectly flat top). Apply a thin “crumb coat” of frosting over the entire cake and chill for 15 minutes. Finally, apply the remaining frosting in decorative swirls or a smooth finish.
Expert Cooking Tips
- Temperature Matters: Ensure your buttermilk and eggs are at room temperature. Cold ingredients can cause the batter to break or result in an uneven bake.
- The Vinegar Secret: Don’t skip the vinegar. It reacts with the baking soda to create carbon dioxide bubbles, which is what gives the cake its light, airy “velvet” lift.
- Natural Cocoa: Always use natural cocoa powder. Dutch-processed cocoa has been neutralized and won’t react as effectively with the acids in the recipe, which can dull the color and affect the rise.
- Even Layers: Use a kitchen scale to weigh your batter into the pans. This ensures both layers are the same height and bake at the same rate.
- Avoid Overbaking: Because the cake is dark red, it’s hard to tell if it’s browning. Trust the toothpick test and the “spring back” feel of the center.
Common Mistakes To Avoid
- Overmixing the Batter: This is the number one cause of a dense, rubbery cake. Mix only until the flour is incorporated.
- Using Cold Cream Cheese: This leads to lumpy frosting. If your cream cheese is cold, the butter cannot emulsify with it properly.
- Substituting Liquid Milk for Buttermilk: Without the acidity of buttermilk, the baking soda won’t activate correctly, and the cake will be flat and heavy.
- Not Sifting Powdered Sugar: Cream cheese frosting is prone to lumps; sifting your sugar is the only way to ensure a professional, silky texture.
- Frosting a Warm Cake: Even a slightly warm cake will turn your frosting into a runny mess. Patience is key!
Health Benefits and Dietary Considerations
While red velvet cake is an indulgent dessert, it does offer some nutritional elements depending on your ingredients:
- Protein: The eggs and buttermilk provide a modest amount of protein per slice.
- Calcium: The cream cheese and buttermilk contribute to your daily calcium intake.
- Antioxidants: Cocoa powder, even in small amounts, contains flavonoids.
Dietary Variations:
- Gluten-Free: Substitute the all-purpose flour with a high-quality 1:1 gluten-free baking flour blend that contains xanthan gum.
- Vegan: Use a flax egg (1 tbsp ground flax + 3 tbsp water per egg), vegan butter, vegan cream cheese, and soy milk mixed with apple cider vinegar for the buttermilk.
- Low-Carb: While difficult for this specific cake, some bakers use almond flour and erythritol, though the texture will be significantly different.
Variations
Spicy Red Velvet
Add a half-teaspoon of cayenne pepper to the dry ingredients. The heat subtly enhances the cocoa and provides a surprising finish that pairs beautifully with the sweet frosting.
Smoky Red Velvet
Use a drop of liquid smoke or a pinch of smoked paprika in the batter to create a deep, earthy complexity that mimics the “original” Waldorf-Astoria style.
Blue Velvet
Simply swap the red food coloring for royal blue gel coloring. It’s a fun twist for gender reveals or themed parties, maintaining the same delicious flavor.
What To Serve With Red Velvet Cake
Side Dishes
Serve with a side of fresh raspberries or strawberries. The tartness of the berries cuts through the richness of the cream cheese.
Drinks
A cold glass of whole milk is the classic choice. For adults, a cup of strong, dark roast coffee or a glass of dessert wine like Brachetto d’Acqui pairs wonderfully.
Holiday Pairings
During the holidays, serve this alongside a peppermint mocha or a spiced chai latte to lean into the festive spirit.
Storage Instructions
Refrigerator Storage
Because of the cream cheese frosting, this cake must be stored in the refrigerator. Place it in a cake carrier or cover it loosely with plastic wrap. It will stay fresh for up to 5 days.
Freezer Storage
You can freeze the unfrosted cake layers by wrapping them tightly in plastic wrap and then foil. They will last for 3 months. To freeze a frosted cake, place it in the freezer for an hour to set the frosting, then wrap it carefully.
Reheating Instructions
Red velvet is best enjoyed slightly cool or at room temperature. Take it out of the fridge 30 minutes before serving to let the frosting soften.
Nutritional Information
| Nutrient | Amount per Serving |
|---|---|
| Calories | 485 kcal |
| Protein | 6g |
| Carbohydrates | 58g |
| Total Fat | 26g |
| Fiber | 1g |
| Sugar | 42g |
Nutrition values are estimates and may vary depending on ingredients used.
FAQs
Is red velvet cake basically just chocolate cake?
No, it is not. While it contains cocoa powder, the amount is much smaller than in a standard chocolate cake. The primary flavor of red velvet comes from the chemical reaction between buttermilk, vinegar, and cocoa, which creates a unique “tangy” and mild chocolate profile that is distinct from a rich chocolate sponge.
What is the secret to red velvet cake?
The secret is the combination of acidity and moisture. Using both buttermilk and vinegar ensures the baking soda reacts vigorously, creating the “velvet” texture. Additionally, using oil instead of butter ensures the cake stays moist even when stored in the refrigerator.
Why did my red velvet cake turn brown?
This usually happens if you use Dutch-processed cocoa powder or if the pH balance is off. Natural cocoa powder is acidic and helps maintain the red hue. Also, ensure you are using enough food coloring; gel colors are more stable under heat than liquid ones.
Can I make this cake eggless?
Yes. You can substitute the two eggs with ½ cup of unsweetened applesauce or a commercial egg replacer. The cake may be slightly denser but will still be delicious.
How do I get the frosting so white?
To get bright white cream cheese frosting, beat your butter alone for several minutes until it turns very pale before adding the cream cheese. You can also add a tiny drop of violet food coloring to neutralize the yellow tones of the butter.
Recipe Summary
| Prep Time | 30 Minutes |
|---|---|
| Cook Time | 35 Minutes |
| Total Time | 1 Hour 5 Minutes |
| Servings | 12 Slices |
| Main Flavor Notes | Tangy, mild cocoa, creamy vanilla |
| Best Occasions | Birthdays, Valentine’s Day, Christmas |
Conclusion
Mastering the red velvet cake is a rite of passage for any serious home baker. It is a recipe that relies on the harmony of simple ingredients to create something far greater than the sum of its parts. By following this guide, you aren’t just making a cake; you are creating a sensory experience defined by a delicate, velvety crumb and a perfectly balanced frosting.
This cake is worth making because it bridges the gap between elegance and comfort. It’s sophisticated enough for a formal dinner party yet familiar enough for a casual family gathering. The vibrant red color always sparks conversation, and the first bite—rich, tangy, and soft—always delivers on the promise of its iconic name. We encourage you to try this recipe, pay close attention to the “tang” of the buttermilk, and enjoy the process of assembling this classic. Don’t forget to leave a comment below letting us know how your bake turned out, and share this recipe with the fellow dessert lovers in your life!


