Creamy Frozen Hot Chocolate Recipe: The Perfect Chilled Treat
Imagine the comforting, nostalgic flavor of a steaming mug of hot cocoa, but reimagined as a frosty, refreshing slushy that’s perfect for a sweltering summer afternoon. That is the magic of a frozen hot chocolate. It’s not quite a milkshake, and it’s certainly not just chocolate milk with ice cubes. It is a sophisticated, blended dessert drink that balances the deep, complex notes of high-quality chocolate with a light, icy texture that dances on the tongue. Originally made famous by iconic NYC eateries, this chilled indulgence has become a global sensation for those who want their chocolate fix without the heat.
Whether you are hosting a backyard birthday party, looking for a decadent mid-afternoon pick-me-up, or craving a sweet treat after a heavy dinner, this recipe delivers. The beauty of making this at home lies in the customization. You can control the richness, the sweetness, and the quality of the chocolate, ensuring a gourmet experience that puts coffee shop versions to shame. In this guide, we will explore the nuances of achieving the perfect “slush” consistency, the best chocolate blends to use, and how to garnish your creation like a professional pastry chef.
Quick Recipe Overview
| Feature | Details |
|---|---|
| Cuisine | American / Dessert |
| Course | Beverage / Dessert |
| Prep Time | 10 Minutes |
| Cook Time | 2 Minutes (Melting Chocolate) |
| Total Time | 12 Minutes |
| Servings | 2 Large Servings |
| Calories | 410 kcal per serving |
| Difficulty Level | Easy |
Why You’ll Love This Recipe
- The Perfect Texture: Unlike a milkshake, which is heavy and dairy-forward, this recipe uses ice to create a refreshing, crystalline structure that feels lighter but still incredibly indulgent.
- Customizable Sweetness: By using a mix of semi-sweet and dark chocolate, you can dial the sugar levels up or down to suit your personal palate.
- Year-Round Appeal: Who says hot chocolate is just for winter? This version brings those cozy flavors into the spring and summer months effortlessly.
- Budget-Friendly Luxury: You don’t need to fly to New York or visit an expensive cafe to enjoy a gourmet chocolate treat; you likely have most of these ingredients in your pantry right now.
- Kid and Adult Approved: It’s a whimsical drink that delights children but has enough flavor complexity to satisfy the most discerning adult chocolate lover.
- Quick Preparation: From start to finish, you can have a restaurant-quality dessert ready in under 15 minutes.
Ingredients
Ingredients You’ll Need
To achieve that signature rich flavor, we use a combination of real melted chocolate and high-quality cocoa powder. This provides both depth and a smooth finish.
- High-Quality Chocolate (4 oz): Use a bar of semi-sweet or dark chocolate (60% cacao is ideal). Avoid chocolate chips if possible, as they contain stabilizers that can affect the melting process.
- Unsweetened Cocoa Powder (2 tablespoons): This adds an extra punch of chocolate intensity. Dutch-processed cocoa works best for a smoother, darker flavor.
- Granulated Sugar (2 tablespoons): Adjust this based on how sweet your chocolate bar is.
- Whole Milk (1.5 cups): For the creamiest result, whole milk is recommended, though you can use lower-fat versions.
- Ice Cubes (3 cups): Use fresh ice to avoid any “freezer” taste. The amount of ice determines the thickness of the drink.
- Heavy Whipping Cream (for topping): Freshly whipped cream is the “crown” of this dessert.
- Chocolate Shavings: For a beautiful, professional-looking garnish.
Optional Add-Ins
- Vanilla Extract: A teaspoon of pure vanilla extract enhances the chocolate notes.
- Sea Salt: A tiny pinch of flaky sea salt can cut through the sweetness and elevate the cacao flavor.
- Espresso Powder: Half a teaspoon won’t make it taste like coffee, but it will make the chocolate taste “more like chocolate.”
- Peppermint Extract: For a refreshing wintery twist during the holidays.
Ingredient Substitutions
- Dairy-Free: Swap the whole milk for full-fat oat milk or coconut milk. Use a dairy-free dark chocolate bar.
- Sweetener: You can replace granulated sugar with maple syrup, honey, or a sugar-free alternative like monk fruit sweetener.
- Chocolate: If you don’t have a chocolate bar, you can increase the cocoa powder to 4 tablespoons and add an extra tablespoon of sugar, though the texture will be slightly less silky.
Equipment Needed
- High-Speed Blender: This is crucial for crushing the ice into a smooth, slushy consistency without leaving large chunks.
- Small Saucepan: For melting the chocolate and whisking the base.
- Whisk: To ensure the cocoa and sugar are fully incorporated into the melted chocolate.
- Measuring Cups and Spoons: Precision matters for the perfect ice-to-liquid ratio.
- Chilled Glasses: Serving in glasses that have been in the freezer for 10 minutes helps keep the drink from melting too quickly.
How To Make Frozen Hot Chocolate
Step 1: Melt the Chocolate Base
Start by breaking your chocolate bar into small, uniform pieces. Place them in a small saucepan over low heat. Add the cocoa powder and sugar. Slowly pour in about 1/2 cup of the milk. Whisk constantly as the chocolate begins to melt. You are looking for a glossy, smooth, and thick chocolate syrup. Be careful not to let it boil; we just want it melted and integrated. Once smooth, remove from heat and let it cool to room temperature. This is a critical step—if the mixture is too hot, it will melt your ice instantly, resulting in a watery drink.
Step 2: Combine in the Blender
Once your chocolate base has cooled down, pour it into your blender. Add the remaining 1 cup of milk and any optional extracts like vanilla or espresso powder. Finally, add the 3 cups of ice. Using a high-speed blender is beneficial here because it pulverizes the ice into a fine snow-like texture rather than just small pebbles.
Step 3: Blend to Perfection
Start the blender on a low speed to break up the large ice chunks, then quickly increase to high. Blend for about 30 to 45 seconds. Watch the texture through the blender jar—you want to see a consistent, thick, slushy movement. If the blades are spinning but not moving the mixture, stop the blender, stir with a spatula, and add a splash more milk if necessary. The aroma at this stage should be intensely chocolatey and cool.
Step 4: Prepare the Toppings
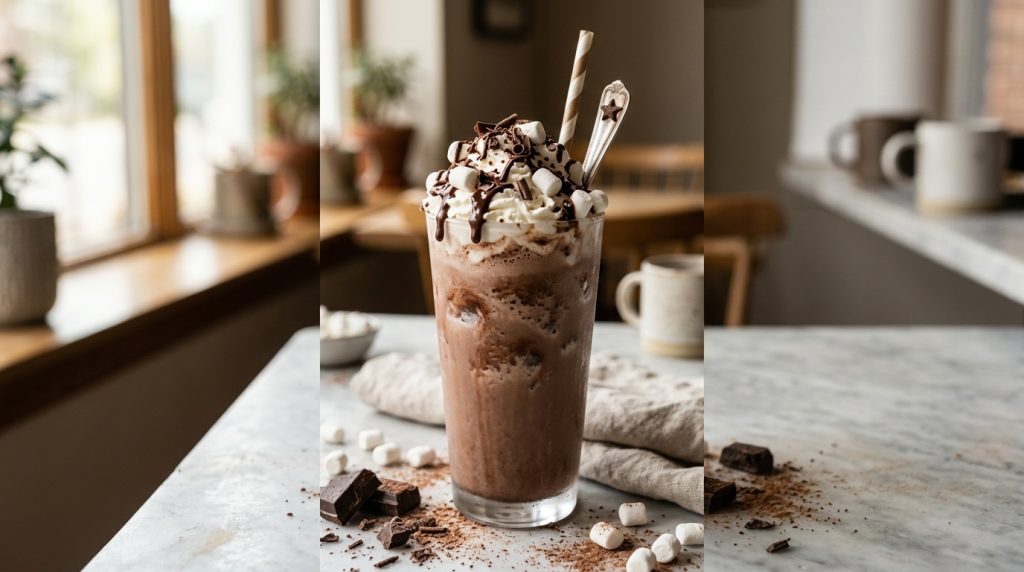
While the blender is doing its work, whip your heavy cream until stiff peaks form. You can add a touch of sugar to the cream, but since the drink is already sweet, unsweetened whipped cream provides a nice balance. If you’re feeling fancy, use a vegetable peeler to create chocolate shavings from a leftover piece of your chocolate bar.
Step 5: Assemble and Serve
Pour the frozen hot chocolate into your pre-chilled glasses. The mixture should be thick enough to hold a slight mound at the top. Immediately dollop or pipe a generous amount of whipped cream onto each glass. Sprinkle with chocolate shavings or a dusting of cocoa powder. Serve with a straw and a long spoon to catch every last drop of the chocolatey goodness.
Expert Cooking Tips
- Chill the Base: If you are in a hurry, you can place the saucepan with the melted chocolate into an ice bath to cool it down in minutes.
- Quality Over Quantity: Since chocolate is the star of the show, use the best brand you can afford. Valrhona, Guittard, or Ghirardelli offer excellent results compared to standard baking chocolate.
- The Ice Ratio: If you prefer a “sippable” drink, use slightly less ice. If you want a thick, spoonable dessert, use the full 3 cups or even a bit more.
- Avoid Over-Blending: Blending for too long generates heat from the friction of the blades, which will start to melt the drink. Stop as soon as the texture is uniform.
- Layering Flavors: Try rubbing the rim of the glass with a bit of chocolate syrup and dipping it in crushed graham crackers for a “S’mores” inspired presentation.
Common Mistakes To Avoid
- Using Hot Chocolate Mix Only: While you can make this with just a packet of Swiss Miss, it won’t have the same velvety mouthfeel or rich flavor as using a real melted chocolate bar.
- Adding Too Much Liquid: It is tempting to add more milk to help the blender, but this can quickly turn your slushy into a thin chocolate milk. Use the “pulse” setting and a tamper if your blender has one.
- Neglecting to Cool the Chocolate: Pouring hot melted chocolate directly onto ice results in “thermal shock,” which creates weirdly textured ice crystals and a thin drink.
- Using Old Ice: Ice that has been sitting in the freezer for weeks can absorb odors from other foods. Use fresh ice for the cleanest flavor.
- Skimping on the Garnish: A large part of the “Frozen Hot Chocolate” experience is the visual appeal. Don’t skip the whipped cream!
Health Benefits
While frozen hot chocolate is undeniably a treat, it does offer some nutritional benefits, especially when made with high-quality ingredients.
- Antioxidants: Dark chocolate is rich in flavonoids, which are powerful antioxidants that support heart health and improve blood flow.
- Calcium and Vitamin D: By using whole milk or fortified plant milks, you’re getting a good dose of calcium for bone health.
- Mood Booster: Chocolate contains phenylethylamine, the same chemical your brain creates when you’re falling in love, alongside small amounts of caffeine and theobromine to give you a gentle energy lift.
- Protein: If made with dairy or soy milk, this drink provides a modest amount of protein to help satisfy hunger.
Dietary Considerations: To make this Vegan, use coconut milk and a vegan dark chocolate. For a Low-Carb version, use heavy cream diluted with water instead of milk, and use a keto-friendly sweetener and 90% dark chocolate.
Variations
Vegan Version
Substitute the whole milk with creamy oat milk and use a high-quality vegan dark chocolate bar. Top with whipped coconut cream for a completely plant-based indulgence that is just as rich as the original.
Spicy Mexican Frozen Hot Chocolate
Add 1/2 teaspoon of ground cinnamon and a tiny pinch of cayenne pepper to the chocolate melting stage. The subtle heat from the pepper against the cold, icy chocolate is an incredible sensory experience.
Peanut Butter Swirl
Add a tablespoon of creamy peanut butter to the blender. The saltiness of the peanut butter perfectly complements the sweet chocolate, creating a flavor profile reminiscent of a frozen peanut butter cup.
White Chocolate Matcha
For a unique twist, use white chocolate instead of dark, and add a teaspoon of culinary-grade matcha powder. This results in a beautiful green hue and a sophisticated, earthy flavor.
Salted Caramel
Drizzle salted caramel sauce into the blender and also on the inside of the glass before pouring. The ribbons of caramel throughout the frozen chocolate are pure bliss.
What To Serve With Frozen Hot Chocolate
Side Dishes
- Fresh Berries: A bowl of tart raspberries or strawberries provides a bright contrast to the rich chocolate.
- Shortbread Cookies: The buttery, crumbly texture of shortbread is the perfect vessel for dipping into the whipped cream.
- Pretzels: If you love the sweet-and-salty combination, serving some thin pretzel sticks on the side is a game-changer.
Party Serving Ideas
For a summer party, set up a “Frozen Hot Chocolate Bar.” Provide the blended base in a large insulated pitcher and let guests choose their own toppings like mini marshmallows, crushed candy canes, sprinkles, and different flavored syrups.
Storage Instructions
Refrigerator Storage
Frozen hot chocolate is best enjoyed immediately. If you put it in the refrigerator, the ice will melt, and you will be left with a very thick chocolate milk. It will still taste good, but the “frozen” experience will be gone.
Freezer Storage
You can freeze leftovers in an airtight container. However, it will freeze solid. To enjoy it again, you would need to let it thaw slightly and then re-blend it with a splash of milk to regain the slushy consistency.
Meal Prep Tips
You can make the “chocolate base” (the melted chocolate, cocoa, sugar, and a bit of milk) in large batches and store it in the fridge for up to a week. When you’re ready for a drink, just measure out the base, add the rest of the milk and ice, and blend!
Nutritional Information
| Nutrient | Amount Per Serving |
|---|---|
| Calories | 410 kcal |
| Protein | 8g |
| Total Fat | 22g |
| Carbohydrates | 48g |
| Fiber | 4g |
| Sugars | 38g |
Nutrition values are estimates and may vary depending on ingredients used.
FAQs
Is frozen hot chocolate just a milkshake?
No, they are quite different! A milkshake is made by blending milk and ice cream, resulting in a very thick, dairy-heavy, and smooth texture. Frozen hot chocolate is made with milk, real chocolate, and ice, giving it a lighter, slushy-like consistency that is more refreshing and less “heavy” than a traditional shake.
Can I make this in advance?
Because it relies on crushed ice for its texture, it is best made and served immediately. However, you can prepare the chocolate syrup base in advance and keep it in the fridge so that the actual blending process takes less than a minute when you’re ready to serve.
How do I make this without a high-speed blender?
If you have a standard blender, try crushing the ice cubes in a plastic bag with a rolling pin before adding them to the blender. This prevents the motor from straining and helps achieve a smoother result with less powerful blades.
What is the best chocolate to use?
For the best flavor, use a semi-sweet chocolate bar with at least 50-60% cacao. Brands like Lindt or Ghirardelli are widely available and melt beautifully. Avoid using only cocoa powder, as the cocoa butter in the real chocolate bar is what provides the creamy mouthfeel.
Can I use hot chocolate mix packets?
Yes, you can substitute the melted chocolate and cocoa powder with 2-3 packets of hot chocolate mix. However, the flavor will be less intense and the texture may be slightly thinner. If using packets, reduce the added sugar, as most mixes are already very sweet.
Recipe Summary
| Category | Summary |
|---|---|
| Prep Time | 10 Minutes |
| Main Flavor Notes | Rich Cocoa, Creamy, Refreshing, Icy |
| Best Occasions | Summer Parties, After-School Treats, Dessert |
| Key Secret | Melting real chocolate bars into the base |
Food Photography Prompts
If you’re documenting your culinary creation, here are a few prompts to get the best shots:
- The Pour Shot: “A high-angle, close-up shot of thick, frosty chocolate liquid being poured into a chilled glass, with ice crystals visible in the stream and soft natural morning light.”
- The Garnish Detail: “Macro photography of a mountain of whipped cream topped with delicate dark chocolate shavings, with a blurred background of a summer garden.”
- The Lifestyle Scene: “Two glasses of frozen hot chocolate on a rustic wooden table, condensation on the glass, a colorful straw, and a few scattered cocoa beans and chocolate pieces around the base.”
Conclusion
The frozen hot chocolate is more than just a drink; it is a delightful contradiction. It manages to be both cozy and cooling, sophisticated and whimsical. By taking the time to melt real chocolate and balance it with the perfect amount of ice and milk, you create a dessert that is far superior to any store-bought mix or fast-food alternative. This recipe is a testament to how a few simple, high-quality ingredients can be transformed into something extraordinary with just a bit of blending.
Whether you’re looking to cool down on a humid July afternoon or want to surprise your family with a fun twist on a winter classic, this frozen hot chocolate recipe is your new go-to. It’s easy enough for a weeknight but impressive enough for a celebration. Don’t forget to experiment with the variations—a little cinnamon or a swirl of caramel can make each glass feel like a brand-new discovery. If you try this recipe, we would love to hear how it turned out! Leave a comment below, share your photos on social media, and let us know what your favorite toppings are. Happy blending!